18. Notes
This chapter various notes that were taken during the course of the project. Mostly these are related to design/implemenation iterations, where a particular design or component was not used further in the project, but we did not want to loose various details, as we may revisit these technologies in another phase or project.
18.1. Calibration
Within the SE project a separate activity is performed for gas-calibration based on Big Data Analysis statistical methods. Values coming from SE sensors were compared to actual RIVM values. By matching predicted values with RIVM-values, a formula for each gas-component is established and refined. The initial approach was to use linear analysis methods. However, further along in the project the use of Artificial Neural Networks (ANN) appeared to be the most promising.
Below are notes from the (discarded) Linear Analysis approach for historic/future ref. This was implemented and described in this GitHub repo: https://github.com/pietermarsman/smartemission_calibration . By using the R-language, reports in PDF are generated.
18.1.1. O3 Calibration
O3 seemed to be the most linear. See the resulting O3 PDF report.
From the linear model comes the following formula for the conversion from resistance (kOhm) to ug/m3 (at 20C and 1013 hPa)
O3 = 89.1177
+ 0.03420626 * s.coresistance * log(s.o3resistance)
- 0.008836714 * s.light.sensor.bottom
- 0.02934928 s.coresistance * s.temperature.ambient
- 1.439367 * s.temperature.ambient * log(s.coresistance)
+ 1.26521 * log(s.coresistance) * sqrt(s.coresistance)
- 0.000343098 * s.coresistance * s.no2resistance
+ 0.02761877 * s.no2resistance * log(s.o3resistance)
- 0.0002260495 * s.barometer * s.coresistance
+ 0.0699428 * s.humidity
+ 0.008435412 * s.temperature.unit * sqrt(s.no2resistance)
18.2. SOS Services
We tested istSOS at an early stage.
18.2.1. istSOS - Install Test
Notes from raw install as Python WSGI app, see also http://istsos.org/en/latest/doc/installation.html:
# as root
$ mkdir /opt/istsos
$ cd /opt/istsos
# NB 2.3.0 gave problems, see https://sourceforge.net/p/istsos/tickets/41/
$ wget https://sourceforge.net/projects/istsos/files/istsos-2.3.0.tar.gz
$ tar xzvf istsos-2.3.0.tar.gz
$ mv istsos 2.3.0
$ ln -s 2.3.0 latest

$ chmod 755 -R /opt/istsos/latest
$ chown -R www-data:www-data /opt/istsos/latest/services
$ chown -R www-data:www-data /opt/istsos/latest/logs
$ mkdir /opt/istsos/latest/wns   # not present, need to create, no is for web notification service
$ chown -R www-data:www-data /opt/istsos/latest/wns # not present, gives error (?)
Add WSGI app to Apache conf.
Setup the PostGIS database.
    $ sudo su - postgres
$ createdb -E UTF8 -O sensors istsos
Password:
$ psql -d istsos -c 'CREATE EXTENSION postgis'
Password:
CREATE EXTENSION
Restart and test:
    $ service apache2 restart

    # in browser
    http://api.smartemission.nl/istsos/admin/

    # Database: fill in user/password

    # create service (creates DB schema) "sound"

# test requests
http://api.smartemission.nl/istsos/modules/requests/

# REST
http://api.smartemission.nl/istsos/wa/istsos/services/sound
18.3. Fiware
Initially it was planned to run the SE platform on Fiware, but due to technical problems this was postponed and is still on hold. Below some notes on installation.
The Fiware Lab NL provides a cloud-based computing infrastructure in particular for “Smart City” applications. Based on the adopted “Docker-Strategy” for the Smart Emission Data Platform as described within the Architecture chapter, this chapter will describe the actual “hands-on” installation steps.
In order to start installing Docker images and other tooling we need to “bootstrap” the system within the Fiware environment.
18.3.1. Fiware Lab NL
Creating a (Ubuntu) VM in the Fiware Lab NL goes as follows.
- login at http://login.fiware-lab.nl/
- create an SSL keypair via http://login.fiware-lab.nl/dashboard/project/access_and_security/
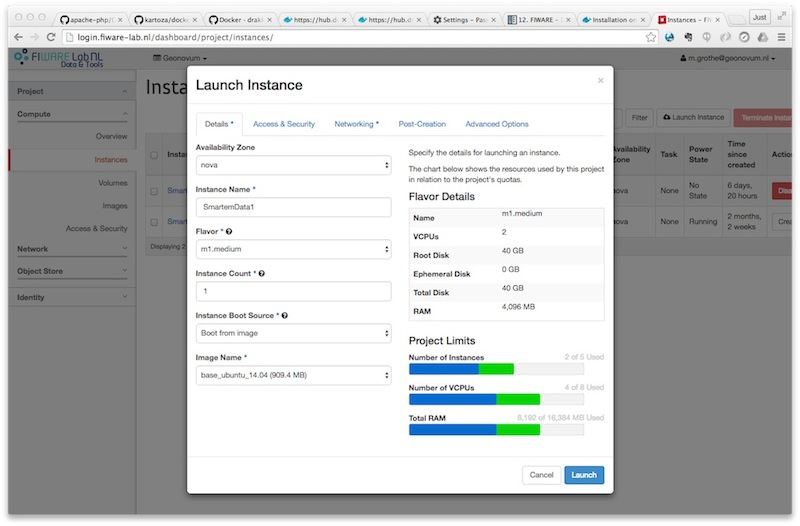
- create a VM-instance via http://login.fiware-lab.nl/dashboard/project/instances/ Launch Instance button

Creating a Ubuntu VM instance in Fiware Lab NL
See the popup image above, do the following selections in the various tabs:
- Launch Instance tab: select boot from image, select
base_ubuntu_14.04 - Access&Security tab: select keypair just created and enable all security groups
- Networking tab: assign both
floating-IPandshared-netto selected networks - other tabs: leave as is
- login via
ssh -i <privkey_from_keypair>.pem ubuntu@<IP_address>